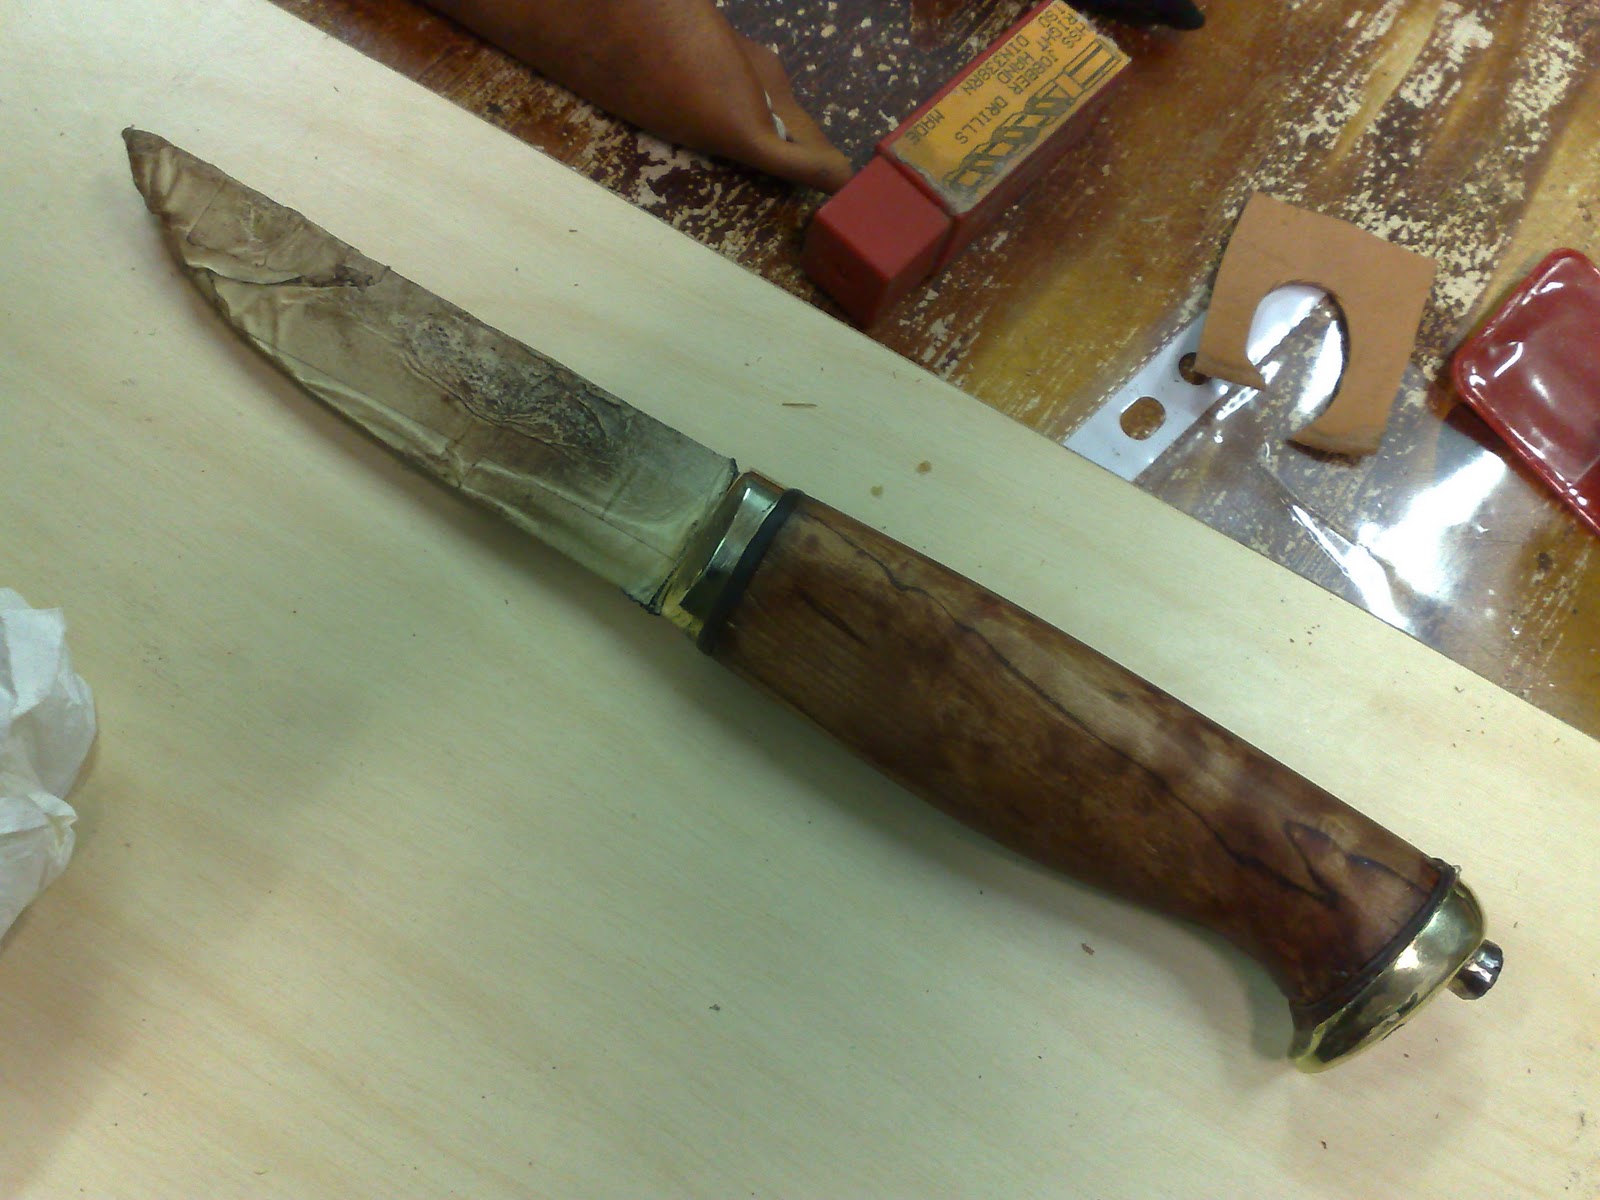
So i have received the second prototype of Seikku´s brutal bush "knife". Its something between leuku and campknife,axe and whet ever but man i do like it !
Ive already chopped quite a bit with it and whittled some fire starting sticks and shavings, cleaned some bush and all sorts of chores. It has a good mass and seems to stay sharp for a long time.
Well, ill be using this more ant tell you more,but already you can order yours,too. With this type of tool you arent paying for over priced hunk of steel thats only ground from blank, no man, this has been forged and forging makes miracles to insides of steels. No mosaic pins to rise up the price,no exotic steels,no rare wood species, just business for hard use.
Some slowly updating notes about me,my life,outdoor activities,bushcraft,knives,survival skills etc...
tiistai 29. maaliskuuta 2011
maanantai 28. maaliskuuta 2011
Bahco Laplander´s new clothing
So,i ´ve been bit on flu and fever but i cant stay put, i just have to craft a little.
Todays condition allowed me to craft this leather belt sheath for my folding saw. Yep,its back in black, again, sorry folks. I just know that most of my other belt carry sheaths and pouches are mostly in black leather so this fits in with em on the belt just nicely, i think.
tiistai 22. maaliskuuta 2011
Sheath project done, with firesteel and sharpener added.
So heres the sheath for the knife i mentioned couple posts before,the one originally forged by Ilkka Seikku and finished and re-ground by myself.
I wanted to add a few functions to the sheath. The first thing was to fabricate two reindeer antler handles. The other would be for Light My Fire´s thick Army firesteel and the other i made for the diamond sharpening rod.
I had a Marttiini´s retractable pen shaped diamond rod, so i just got rid off the excess parts of it and kept the rod itself. In the picture above its in its original length but i took over an inch off from the tail of it to keep it properly short sized.
Heres the handle for sharpener an the shortened rod itself.
Then i removed the firesteel from its plastic handle with heat and blade...
Then i attached the handles to the gadgets with epoxy :
Then the actual leatherworking began. I didnt take pictures as i forgot to and i just wanted to get the sheath ready without playing with photoshoots...
And in some point it was ready without dye:
And i just put some black ink on, and let it dry and then waxed it and here you go:
Its deep and has a good "click" when the knife locks in the sheath. I made the beltloop as dangler type and its large enough to slip over sami belts as well as US army type of duty belts etc. The diamond sharpener is in the spine-side of the sheath and the firesteel...well youll see where it goes.
What do you think ? Id say its practical if not pretty and practical goes always over the looks in my books.
I wanted to add a few functions to the sheath. The first thing was to fabricate two reindeer antler handles. The other would be for Light My Fire´s thick Army firesteel and the other i made for the diamond sharpening rod.
I had a Marttiini´s retractable pen shaped diamond rod, so i just got rid off the excess parts of it and kept the rod itself. In the picture above its in its original length but i took over an inch off from the tail of it to keep it properly short sized.
Heres the handle for sharpener an the shortened rod itself.
Then i removed the firesteel from its plastic handle with heat and blade...
Then i attached the handles to the gadgets with epoxy :
Then the actual leatherworking began. I didnt take pictures as i forgot to and i just wanted to get the sheath ready without playing with photoshoots...
And in some point it was ready without dye:
And i just put some black ink on, and let it dry and then waxed it and here you go:
Its deep and has a good "click" when the knife locks in the sheath. I made the beltloop as dangler type and its large enough to slip over sami belts as well as US army type of duty belts etc. The diamond sharpener is in the spine-side of the sheath and the firesteel...well youll see where it goes.
torstai 17. maaliskuuta 2011
Leuku again.
So here it is, my crude new working mans leuku. What do you think about it ?
I already had a go with it,and it whittles ok and seems sturdy, plus the long and heavy handle fits my hand, its made quite long as you see,so i can have gloves on and use it,at winter. Ill be adding one or two cross drilled pins between handle parts and tang and put in a leather wrist lanyard too, soon, but its ready to go already and im about to use it for next weekends hike & cabin trip.
Sheath i did pretty fast too,it has a sturdy wooden liner and a large belt loop so i can slip it over duty belt. Its just a piece of leather that was left in shops floor so its all scratched already,i just stitches and cut it,stamped a few rivets, and dyed it black and rubbed some Grangers G-Wax on it. I think its ok.
I already had a go with it,and it whittles ok and seems sturdy, plus the long and heavy handle fits my hand, its made quite long as you see,so i can have gloves on and use it,at winter. Ill be adding one or two cross drilled pins between handle parts and tang and put in a leather wrist lanyard too, soon, but its ready to go already and im about to use it for next weekends hike & cabin trip.
Sheath i did pretty fast too,it has a sturdy wooden liner and a large belt loop so i can slip it over duty belt. Its just a piece of leather that was left in shops floor so its all scratched already,i just stitches and cut it,stamped a few rivets, and dyed it black and rubbed some Grangers G-Wax on it. I think its ok.
keskiviikko 16. maaliskuuta 2011
Selfmade Leuku Project
This is one to finish off soon. Its hammered from 10mm (3/8")spring steel piece, took a lot oa effort to thin it to variable thickness of 5 to 7 millimeters. Its done by forging not any stock removal,the bevels are forged as well as the tang too. I did grind the bevels then after forging them offcourse. Its 40 millimeters high and 5 millimeters thick in front of handle and then it gets a bit higher (heavier) towards. At the highest point its 47 millimeters and 7 millimeters thick, for mass and chopping performance. I did a good long whittling edge in the front of blade and then at the chopping art,its a lot duller convez and the again in the tip its shaving sharp (yep,it shaves in reality). In the bacside of the tip theres sharp edged 45 degree grind to crack bones and joints. The rest of the spine is ground coarse to have a lot of edge to throw sparks from firesteels. I heat treated this bit special way by insulating averything except the actual bevel parts,so the spine is mild and flexible and the edges are hard. This can be yanked like its a spring and it wont bend and it will return to its straight shape,without damaging the edges at all.
Tomorrow ill try to have time to make the handle ready,maybe even the sheath too,who knows. The handle has some deer bits in it as well as the "regular" curly birch. This is my one take on a more traditional leuku at the knife making course where i teach. I tried to keep it traditional but i wanted to put that whittling power in it,and i did a bit of crude filework in the spine,and the sheath will most likely have a built in place for 3/8" firesteel and a small diamond sharpening rod.
Im doing it as it should be, meaning its made to be used,nothings going to be over-fined nor polished,as it wouldnt serve the purpose. Not that theres anything against shiney stuff but ive noticed that the more crude they are,the more they are carried and used.
Tomorrow ill try to have time to make the handle ready,maybe even the sheath too,who knows. The handle has some deer bits in it as well as the "regular" curly birch. This is my one take on a more traditional leuku at the knife making course where i teach. I tried to keep it traditional but i wanted to put that whittling power in it,and i did a bit of crude filework in the spine,and the sheath will most likely have a built in place for 3/8" firesteel and a small diamond sharpening rod.
Im doing it as it should be, meaning its made to be used,nothings going to be over-fined nor polished,as it wouldnt serve the purpose. Not that theres anything against shiney stuff but ive noticed that the more crude they are,the more they are carried and used.
perjantai 4. maaliskuuta 2011
Victorinox junk yard.
I saw one blog story last night about modified , limited edition custom Victorinox here.
So i wanted to show you my own self made Vic´s, scraped together from various models.
As these are for actual personel use,and the rivets arent the nicests jobs, but these are workhorses,not showcase items. They have marks from life in the trail and tehy dont have any collectible value but theyre nice little gadgets to my personal taste.
First one is the simplified Alox with just a single,plain blade and an ever useful awl, which i find to be about the nicest design,compared to any other folding knives awl,as it folds out from the knives end, not from backside and middle,like it does on the plastic handled Vics etc.
Its actually made from Farmer model that had a broken saw implement that i took off after removing the riveted pins and the first layer that had the quite useless openers with flathead screwdrivers that i rarely use.
Second one this time is bit larger Alox based. Its done from Electrician model wreck if i remember right. I like that chisel ground small blade thats good for delicate and accurate carving, so its the only blade found in this one,as i normally tend to use a real fixed blade knife with me, so in this,the basic blade would mean just excess thickness and bulky tool. Awl is in the same layer with the small blade. Then on the next layer there´s the saw, an implement that i find the most used with the awl and on Victorinox, its quite powerful to be such small sized and it lasts long. And on the last layer theres the combo tool, having both,the can and the bottle opener in one single tool,as well as middle sized flathead. This is the best opener in small sized Vic´s. With the combo tool theres the phillips screwdriver,modified from some plastic handle Vic. This kind of mixing takes little more effort as you may have to fabricate spacers from brass or similar,in different thicknesses, grind and polish teh backsprings etc but its still REALLy difficult at all. Patience is a virtue.
The last one this time ( i have several modified folding knives,Alox Vic´s with pliers and such ) is my crude Vic, living in my repair kit nowadays. It has just an awl on the back,not any stupid winebottle openers. Id rather see phllips driver on the place of that. Then theres a file,saw,scissors and small pliers,tough enough to help in gear repair, or bending twisted hooks etc. The handles are made from small leftover curly birch, that i just dyed and waxed,theyre put in place for good, with epoxy and no,they dont have those easy dropping and then missing tweezers and toothpick :).
Victorinox Homepage.
So i wanted to show you my own self made Vic´s, scraped together from various models.
As these are for actual personel use,and the rivets arent the nicests jobs, but these are workhorses,not showcase items. They have marks from life in the trail and tehy dont have any collectible value but theyre nice little gadgets to my personal taste.
First one is the simplified Alox with just a single,plain blade and an ever useful awl, which i find to be about the nicest design,compared to any other folding knives awl,as it folds out from the knives end, not from backside and middle,like it does on the plastic handled Vics etc.
Its actually made from Farmer model that had a broken saw implement that i took off after removing the riveted pins and the first layer that had the quite useless openers with flathead screwdrivers that i rarely use.
Second one this time is bit larger Alox based. Its done from Electrician model wreck if i remember right. I like that chisel ground small blade thats good for delicate and accurate carving, so its the only blade found in this one,as i normally tend to use a real fixed blade knife with me, so in this,the basic blade would mean just excess thickness and bulky tool. Awl is in the same layer with the small blade. Then on the next layer there´s the saw, an implement that i find the most used with the awl and on Victorinox, its quite powerful to be such small sized and it lasts long. And on the last layer theres the combo tool, having both,the can and the bottle opener in one single tool,as well as middle sized flathead. This is the best opener in small sized Vic´s. With the combo tool theres the phillips screwdriver,modified from some plastic handle Vic. This kind of mixing takes little more effort as you may have to fabricate spacers from brass or similar,in different thicknesses, grind and polish teh backsprings etc but its still REALLy difficult at all. Patience is a virtue.
The last one this time ( i have several modified folding knives,Alox Vic´s with pliers and such ) is my crude Vic, living in my repair kit nowadays. It has just an awl on the back,not any stupid winebottle openers. Id rather see phllips driver on the place of that. Then theres a file,saw,scissors and small pliers,tough enough to help in gear repair, or bending twisted hooks etc. The handles are made from small leftover curly birch, that i just dyed and waxed,theyre put in place for good, with epoxy and no,they dont have those easy dropping and then missing tweezers and toothpick :).
Victorinox Homepage.
maanantai 21. helmikuuta 2011
Roselli + Mora + Paracord
I got a few things from Mr.Postman-girl today and i opened the box while i was having a cup of coffee. Inside was a Roselli leuku with bit modified handle and a non-original sheath. Also included was a Mora #1 with nice dark handle,laminated blade and leather sheath. Because there was also a wrap of paracord, i instantly had to try out an idea that i got as there was two blades,an extra small sheath and something to tie those together intantly. So, the coffee had to turn a bit cold and i made this:
What do u think ?
I think its pretty nice actually, two blades for both, coarse and finer tasks and an accessory pouch for sharpening stone and firesteel. And in case i Really have to,u can untie the paracord and then i have 8 meters of cord ann yet the both knives are stand alone-type with their own sheaths that can be worn on belt, or the other can be give to someone else.
What do u think ?
I think its pretty nice actually, two blades for both, coarse and finer tasks and an accessory pouch for sharpening stone and firesteel. And in case i Really have to,u can untie the paracord and then i have 8 meters of cord ann yet the both knives are stand alone-type with their own sheaths that can be worn on belt, or the other can be give to someone else.
perjantai 18. helmikuuta 2011
Nice day out in a fresh cool air & sunshine.
Today morning i went to shovel away a pile of snow that had hidden an ATV. It was already starting to shine and the temperature started to heat up from -30c. I had to hook up a start booster as the batteries were almost frozen and if not,still they were on low output level. Then i stuck a heater used in car floors,aginst the engine block. After an hour it started to run like it was being held in tropic´s :).
Then my friend picked me up and we loaded the ATV in the trailer and headed to our destination in certain beachside. Unloaded the ATV and picked up Swedish army tent with its gear like stove and such. then back to the ATV´s location and i drove to this island across the frosen lake,there was even a small camera crew in the trailer with my friend and they were filming our tasks. More my buddies things, i like o stay low :).
So we put up the swedish army tent,it was the first time for me,but what the heck,the tent looked to be cleverly designed, when compared to our army´s smaller "ranger" group tent. No external snares,no wires,no ropes to stumble against and fall and bash the tent. Even the stove was looking better but the actual perfrmance i will see tomorrow.
So as the tent was erected we put up a quick fire, and fried veggie and normal sausages,rolledem in tortilla breads with cheese and it was good after working in cold, the only thing missing was a pot of coffee made on fire and maybe even a beer,atleast i could have one easily:).
It was nice to work in the bush, drive around with ATV, especially due to the nice sunny weather it was all day long, i didnt feel cold a second although it was some -30 to -22 all the time.
Thanks for the day, Esko.
Then my friend picked me up and we loaded the ATV in the trailer and headed to our destination in certain beachside. Unloaded the ATV and picked up Swedish army tent with its gear like stove and such. then back to the ATV´s location and i drove to this island across the frosen lake,there was even a small camera crew in the trailer with my friend and they were filming our tasks. More my buddies things, i like o stay low :).
So we put up the swedish army tent,it was the first time for me,but what the heck,the tent looked to be cleverly designed, when compared to our army´s smaller "ranger" group tent. No external snares,no wires,no ropes to stumble against and fall and bash the tent. Even the stove was looking better but the actual perfrmance i will see tomorrow.
So as the tent was erected we put up a quick fire, and fried veggie and normal sausages,rolledem in tortilla breads with cheese and it was good after working in cold, the only thing missing was a pot of coffee made on fire and maybe even a beer,atleast i could have one easily:).
It was nice to work in the bush, drive around with ATV, especially due to the nice sunny weather it was all day long, i didnt feel cold a second although it was some -30 to -22 all the time.
Thanks for the day, Esko.
lauantai 12. helmikuuta 2011
Pack project
Heres just a quick snapshot of one thing i ´ve been fighting with. Its supposed to end up as a tiny backpack,mainly to carry an axe but it will take in a canteen, small amount of food and maybe a tarp too.
We´ll see how it goes.
It has pieces of broken horse saddles,bags and similar recycled stuff and i am not measuring or drawing any patterns, so it will be naturally crude and raw looking.
We´ll see how it goes.
It has pieces of broken horse saddles,bags and similar recycled stuff and i am not measuring or drawing any patterns, so it will be naturally crude and raw looking.
tiistai 8. helmikuuta 2011
DIY / MYOG : Making a more traditional puukko
Ok,
so as i am participating as assisting teacher at several knife making courses, i "had" to make one puukko to myself, and at the same time teach others, i didnt have opprtunity to forge my own blade as the students were on the anvils but i had this pretty slick, sturdy puukko blade that Mr. Kotavuopio gave me. Its made out of 52100 steel which is used on ball bearing races. Its specailly heat treated so that the edge is pretty damn hard but the spine aint. Blade has some 10 centimeters in it and its pretty heavy as the spine itself starts at thickness off 5 millimeters. The tail is more like on rugged leuku´s.
The next thing was adding a bit of length to the tail so i welded a stainless steel screw to it. I split the end and slipped it over the tang and after a tiny tig welding it was there. I kept the tang cool with wet cloth so the heat treatments wouldnt ruin.
So, the blade was ready and i cut a curly birch block in to about 15 centimeter long pieces in 30 cm radius and with a band saw, i made a bunch of handleblanks for others too. I selected minne and drilled the hole for the tang all the way thru the piece of handle blank. Then i started to file and fit the blade to the handle. I dont know if you already know this but a jigsaw blades and other tiny saw blades are very good tools for the fitting, id say they beat the heck out of files any day.
Then i had the tang starting to perforate the handle pretty well so it was time to look for something, some material to be used in handles ends, we call´em "hela´s". I didnt figure any good source althought i wanted to use antler or cow horn at first but i started to them off .308 rifles brass cartridges since i have bunch of those around.
I carved some coarse molds into cuttlefish mold and then it was time to melt the used brass cartridges to be casted into molds.
I poured a hint of Borax into melting cup of brass and then i cast the stuff into mold and yanked the front part off and it copied pretty well into molds shape,still there was plenty of filing to be done...:)
So it was time to grind,sand and file the brass parts a little,or even more, i dont deny....but the frontal part startted to take its place pretty easily and fitted snugly over blades tang.
Then some rough shaping on the wooden handle that was still a block shaped...
And then more and more, trying to get a nice and useful shape into handle so that it would still fit nicely into brass part as well as into my hand.
The brass piece to be fitted on the tangs end was very heavy and big so i had to shape it pretty much.
It was stiil pretty easy to make the parts fit nicely as the knife could be put in to one piece and then into pieces,thanks to the threaded tang´s extension. It will be gone still,when the knife is all the way ready and i can pound the screw just like a riveted end so it will disappear a the end.
Slowly its staring to look as puukko of some type. It was slow since i wasnt doing it just by myself, as i had to teach and direct, help others and at the side my own puukko was like a example.
In any case, its in this point now. I dyed the handle with water thinned leather colour,and let it suck a lot of oil and i secured the fit between handle and blade with mixture of sawdust and epoxy glue. It was nice to really cast the brass parts, instead of using ones bought from any shop as iprefer doing myself more than just putting up bought pieces. The stainless nut part in the end is, as i mentioned,going to disappear as the handle finds it last position and i get the leather spacers filed to good tight fit. Then its just waiting for the sheath to be made and its then good for my use.
Hope you liked this and found it maybe even useful on your own projects.
so as i am participating as assisting teacher at several knife making courses, i "had" to make one puukko to myself, and at the same time teach others, i didnt have opprtunity to forge my own blade as the students were on the anvils but i had this pretty slick, sturdy puukko blade that Mr. Kotavuopio gave me. Its made out of 52100 steel which is used on ball bearing races. Its specailly heat treated so that the edge is pretty damn hard but the spine aint. Blade has some 10 centimeters in it and its pretty heavy as the spine itself starts at thickness off 5 millimeters. The tail is more like on rugged leuku´s.
The next thing was adding a bit of length to the tail so i welded a stainless steel screw to it. I split the end and slipped it over the tang and after a tiny tig welding it was there. I kept the tang cool with wet cloth so the heat treatments wouldnt ruin.
So, the blade was ready and i cut a curly birch block in to about 15 centimeter long pieces in 30 cm radius and with a band saw, i made a bunch of handleblanks for others too. I selected minne and drilled the hole for the tang all the way thru the piece of handle blank. Then i started to file and fit the blade to the handle. I dont know if you already know this but a jigsaw blades and other tiny saw blades are very good tools for the fitting, id say they beat the heck out of files any day.
Then i had the tang starting to perforate the handle pretty well so it was time to look for something, some material to be used in handles ends, we call´em "hela´s". I didnt figure any good source althought i wanted to use antler or cow horn at first but i started to them off .308 rifles brass cartridges since i have bunch of those around.
I carved some coarse molds into cuttlefish mold and then it was time to melt the used brass cartridges to be casted into molds.
I poured a hint of Borax into melting cup of brass and then i cast the stuff into mold and yanked the front part off and it copied pretty well into molds shape,still there was plenty of filing to be done...:)
So it was time to grind,sand and file the brass parts a little,or even more, i dont deny....but the frontal part startted to take its place pretty easily and fitted snugly over blades tang.
Then some rough shaping on the wooden handle that was still a block shaped...
And then more and more, trying to get a nice and useful shape into handle so that it would still fit nicely into brass part as well as into my hand.
The brass piece to be fitted on the tangs end was very heavy and big so i had to shape it pretty much.
It was stiil pretty easy to make the parts fit nicely as the knife could be put in to one piece and then into pieces,thanks to the threaded tang´s extension. It will be gone still,when the knife is all the way ready and i can pound the screw just like a riveted end so it will disappear a the end.
Slowly its staring to look as puukko of some type. It was slow since i wasnt doing it just by myself, as i had to teach and direct, help others and at the side my own puukko was like a example.
In any case, its in this point now. I dyed the handle with water thinned leather colour,and let it suck a lot of oil and i secured the fit between handle and blade with mixture of sawdust and epoxy glue. It was nice to really cast the brass parts, instead of using ones bought from any shop as iprefer doing myself more than just putting up bought pieces. The stainless nut part in the end is, as i mentioned,going to disappear as the handle finds it last position and i get the leather spacers filed to good tight fit. Then its just waiting for the sheath to be made and its then good for my use.
Hope you liked this and found it maybe even useful on your own projects.
maanantai 7. helmikuuta 2011
Want some high quality firesteels ?
Kotavuopio is offering now a variety of firesteels in many materials and in very fine finishings. At the beginning he´s selling in quarter inch diameter and the firesteels giving a good spark, unlike cheap ones. Ask for material choises and designs, im sure he can put up a custom made firesteel in just about any shape or material. Overseas shipping and Paypal are ok.
maanantai 24. tammikuuta 2011
DIY / MYOG-Bow
Yesterday i had some 7 hours more to accomplish my bow project that i started at saturday.
The year rings ?...grains were dug up to one complete surface with pieces of glass so i would not break the surface with any blades a sit would break the bow in use and ruin it totally :). This was the slowest and most accurate part of the making.
It came out 186 centimeters long and measuring from handle,it starts at 6.5cm width and they taper to the ends to some 2.3 centimeters thin. The profile at the wider parts is guite flatbow-like and the it shape shifts to more like pyramid..or D letter towards the ends.
Its made out of ash ( Fraxinus Exelsior ), i did add a piece of curly birch to it as well,to have better handle shape. Between the curly birch and the ash mainpart is 3 millimeters thick piece of softened leather to prevent the handle from breaking off while tension grows in the bow at pull.
The nocks are made from deer antler. I wish i could have put two pieces in same colour, but i didnt have any so the nocks are now white at other and grey at the other end. I left them unpolished and dyed them with same reddish dark dye as the rest of the bow, maybe same day ill polish them, who knows but now i just ran out of time.
The string is made old school style by twisting and turning but its from Dacron thread. The string in the picture aint the one i made,its just a mock-up piece. The coarse shaping and grounding of nock was a the time to use belt sander,only because the time was getting so limited.
It turned out decently especially if i remember how short time i had to do it. Surely its not a showcase item but as it gave bit over 50 Lb at 28" pull its legal for hunting purposes in Finland. Now ive been wiping oil into it and pulling it slowly,trying to let the oil suck in well. Then after few days im about to wax it off with natural beeswax and polish it, after that its time to slowly start using it by adding the pull slowly so it haves time to set up before taking it to any serious action.
The year rings ?...grains were dug up to one complete surface with pieces of glass so i would not break the surface with any blades a sit would break the bow in use and ruin it totally :). This was the slowest and most accurate part of the making.
It came out 186 centimeters long and measuring from handle,it starts at 6.5cm width and they taper to the ends to some 2.3 centimeters thin. The profile at the wider parts is guite flatbow-like and the it shape shifts to more like pyramid..or D letter towards the ends.
Its made out of ash ( Fraxinus Exelsior ), i did add a piece of curly birch to it as well,to have better handle shape. Between the curly birch and the ash mainpart is 3 millimeters thick piece of softened leather to prevent the handle from breaking off while tension grows in the bow at pull.
The nocks are made from deer antler. I wish i could have put two pieces in same colour, but i didnt have any so the nocks are now white at other and grey at the other end. I left them unpolished and dyed them with same reddish dark dye as the rest of the bow, maybe same day ill polish them, who knows but now i just ran out of time.
The string is made old school style by twisting and turning but its from Dacron thread. The string in the picture aint the one i made,its just a mock-up piece. The coarse shaping and grounding of nock was a the time to use belt sander,only because the time was getting so limited.
It turned out decently especially if i remember how short time i had to do it. Surely its not a showcase item but as it gave bit over 50 Lb at 28" pull its legal for hunting purposes in Finland. Now ive been wiping oil into it and pulling it slowly,trying to let the oil suck in well. Then after few days im about to wax it off with natural beeswax and polish it, after that its time to slowly start using it by adding the pull slowly so it haves time to set up before taking it to any serious action.
lauantai 22. tammikuuta 2011
Crafts of some type,nylon and wood.
Ive been making a few more wood stoves for heating up shelters,and today when i didnt have chance to do welding i got lucky chance to switch a few lessons places and i managed to do little woodcrafts..without electric tools,like they used to do. Its soo much nicer to fabricate wooden stuff with just the basic tools like axe,knife, saw and files,rather than relying on electric jigsaws and belt grinders. This way, i think,you learn a lot about woodworking, your tools and your skills upgrade more than with electric boredoms.
Tools that i use to make the bow.
Beat-up hukari with slight mods in it.
At some point this might be ready bow i hope.
And back at home last evening i made some tinkering to this old sewing machine that wasnt supposed to work at all,but i got it working a bit anyway. I sisnt have any plans nor any un-used stuff to fabricate from,but i tore ou a few old packs to get cloth and such and i made this crude,yet working belt pouch with carabiner,to my Guyot Designs stainless bottle and its GSI Glacier cup. The pouch has also two inner layers,the neoprene,to insulate and protect the bottle and then this soft,mesh type of layer,that also protects a bit, the bottle and makes the insertion easy as the bottle seems to slide better with that mesh. The outer layer itself is 600d waterproof ripstop nylon. Now i have atleast some way to carry the bottle in my belt if i choose to do so,rather than draggin' around any molle pouches.
Tools that i use to make the bow.
Beat-up hukari with slight mods in it.
At some point this might be ready bow i hope.
And back at home last evening i made some tinkering to this old sewing machine that wasnt supposed to work at all,but i got it working a bit anyway. I sisnt have any plans nor any un-used stuff to fabricate from,but i tore ou a few old packs to get cloth and such and i made this crude,yet working belt pouch with carabiner,to my Guyot Designs stainless bottle and its GSI Glacier cup. The pouch has also two inner layers,the neoprene,to insulate and protect the bottle and then this soft,mesh type of layer,that also protects a bit, the bottle and makes the insertion easy as the bottle seems to slide better with that mesh. The outer layer itself is 600d waterproof ripstop nylon. Now i have atleast some way to carry the bottle in my belt if i choose to do so,rather than draggin' around any molle pouches.
Tilaa:
Blogitekstit (Atom)